Monday, 21 October 2013

Butter Salted Egg Yolk Prawn

Butter Salted Egg Yolk Prawn
For this dish, I have done some researches before creating this end result.  Enjoy!

Ingredients:
250g large prawns (deshelled but leave the tail)
Tapioca flour (aka tapioca starch)
2 chicken eggs (separate egg white from the yolk)
3 salted egg yolk (boiled & separate the yolk, mash the yolk)
1-2 tbsp salted butter
4 stalks of curry leaves
1 cili padi (bird eyes chilli)
2 tbsp Maggi concentrated chicken stock
dashes of black pepper
sugar to taste

Method:
Coat the prawns with egg white and tapioca flour.  Deep fried it.  Once it is cooked, drain the oil and leave aside.

Heat butter in the wok using medium fire.  Add in curry leave & cili padi, stir fry until fragrant.  Add in mashed salted egg yolk (you can add in a small portion salted egg whites) and stir until it becomes foamy.

Add in deep fried prawns.  Once the prawns are coated, add in the stock, black pepper and sugar to taste. Lastly, add in chicken egg yolk.

Note:
  1. Chicken egg: if you are using large egg, then 1 is enough.  I added chicken egg yolk in the end so it does not go to waste.  
  2. Curry leaves: you can add more if you like.  Personally, I love to eat the crispy leaves.
  3. Cili padi: if you want it hotter, you can add up to 2 cili padis or more.  Your choice!
  4. Sugar: Careful not to add too much.  The end taste should be balance i.e. salty 50% sweet 50% unless you want it to be either saltier or sweeter.
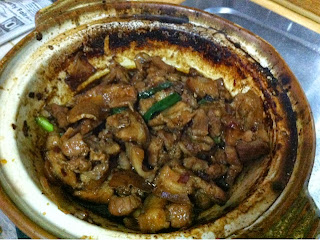
Claypot salted fish pork belly


Claypot Salted Fish Pork Belly
Recipe Source: Amy Beh

Preparation: 10 minutes
Cooking time: 10 minutes

Ingredients:
150g belly port, sliced thinly
70g bonesless salted fish meat, pre-fried until crispy
4 slices ginger
¼ onion, cut into wedges
2 dried red chillies, cut into 2cm sections, seeded
2 stalks spring onion, cut into 4cm lengths 

Seasoning (A):
1½ tbsp oyster sauce
1 tsp sesame oil
½ tsp sugar or to taste
¼ tsp pepper
½ tsp chicken stock granules 

Seasoning (B):
1 tbsp Hua Tiau wine
2-3 tbsp fresh chicken stock
1 tbsp thick soy sauce

Method:
Marinate the pork with seasoning (A).  Heat a claypot over medium high heat.  Add in marinated pork, ginger and onion.  Cover and cook for 1-2 minutes.

Remove the cover and add seasoning (B), dried chillies and pre-fried salt fish pieces.  Stir well to combine then cover the claypot once more.  Once smoke is seen escaping from the cover, remove the lid and give the pot's contents a brief stir.  Add spring onions & serve immediately.

Note:

  1. Claypot: if you don't have a claypot, normal wok will do.  But do add in 1-2 tbsp of oil so the pork, does not stick to the wok.  
  2. Pork belly: If you prefer, you can add more pork belly.
  3. Salted fish: Here, I use mackerel salted fish, and stir-fry it instead of "fried".  The taste is the same unless you wish to be able to bite the crispy salted fish.
  4. Cooking wine: If you don't have Hua Tiau wine, you can omit it, just add few more slices of ginger i.e. 4 more thin slices.
  5. Dried Chillies: here I use Domino Pizza chilli flakes.  
  6. Chicken stock / granules: I use Maggi concentrated stock about 1tsbp in seasoning A and 2.3 tbsp in seasoning B.
  7. Thick soy sauce: you can add more if you prefer the overall meat or sauce to be darker.

Sunday, 23 June 2013

Steamed Seri Kaya Cake

Steamed Seri Kaya Cake
First try & a success.  Very easy to make.  Super tasty, soft & melt in your mouth.

Recipe Source: Steamed Cake - Recipes by Zubaidah Bt Chepa

Preparation: 10 minutes

Ingredients: 
5 eggs

100g superfine flour (or top flour) - sifted
150g castor sugar
180g butter (unsalted)
50g kaya
½ tbsp ovalet 
½ soda bicarbonate - sifted
1 tsp vanilla essence

Method

  1. Beat butter, ovalet & sugar until fluffy.
  2. Fold in egg, one by one.
  3. Add in kaya & blend again.
  4. Finally, fold in soda bicarbonate, flour & vanilla essence.  Stir well.
  5. Grease & line an 7" oval mould.
  6. Pour in batter & steam for 40 minutes.
Notes:
  1. Instead of using 7" oval mould, I used a disposable aluminium tray (215 x 110 x 55mm).
  2. Ovalet is also known as sponge cake emulsifier.
  3. The ingredient portion above can only make one tray as shown in the pic above.  For 2 trays or 1 square mould, just double the ingredient portion above.


Thursday, 30 May 2013

Stir Fry Beef with Enoki Mushroom

Stir Fry Beef with Enoki Mushroom
Serving: 2-3 persons
Preparation: 5 minutes
Marination time: 15 minutes - 2 hours
Cooking Time: 10 - 15 minutes

Ingredients:
300g beef tenderloin
2 pkt enoki mushroom

Marinade:
1 tsp cornstarch
5 tbsp teriyaki sauce
3 tbsp light soy sauce
3 tbsp drinking water
dash of black pepper

Optional:
Chinese or Japanese Rice Wine

Method:
Slice the beef against the grain. Marinade the beef and set aside in refrigerator.
Heat 2 tbsp of cooking oil in the wok and pan fry the beef until 80% cooked.
Add in 2 tbsp rice wine at the side of the wok & stir fry the beef.
Add in enoki mushroom and stir fry until it is slightly soften.


Tuesday, 5 March 2013

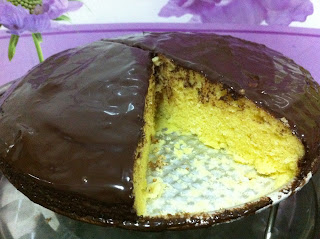
Steamed Moist Chocolate Cake

Steamed Moist Chocolate Cake
True to its title, this steamed chocolate cake is very moist even after you keep it refrigerated.  Also, this is the first time this cake rises nicely.  Simple & easy to prepare using hand whisk.  Enjoy!


Recipe Source: Magic Steamed Kitchen by Alex Goh

Preparation: 10 minutes

Ingredients: 
A
250g castor sugar
½ tsp salt
1 tsp instant coffee powder
3 nos eggs
240g milk
160g vegetable oil
1 tsp vinegar

B270g plain flour
40g cocoa powder
2 tsps double action baking powder
1½ tsps sodium bicarbonate

Method
  1. Mix A until well-blended.
  2. Add in B, mix until well-incorporated.
  3. Pour it into greased and lined 9-inch (22cm) round mould.
  4. Steam for 75 minutes or test with skewer until it comes out clean.  Set aside to cool.
  5. Cover the cake with ganache and top with white chocolate curls.
Ganache
150g whipping cream
300g chopped dark chocolate
40g butter

Method
Cook whipping cream until boil.  Add it into dark chocolate, stir until completely melts.  Add in butter, mix until well-combined.  Leave aside to cool and set for overnight.

Tips
If the ganache is too soft, you may cover the cake with ganache and keep it into refrigerator for half hour.  Remove the cake from refrigeratory and cover it with a thin layer of ganache again.  This will create a smooth ganache coating. 

Notes:
  1. As you can see, instead of using round mould, I used 2 disposable aluminium tray (215 x 110 x 55mm).
  1. I didn't put ganache as it may be too sweet for my liking.  If you want to save trouble of making your own ganache, chocolate spread can be used too. 


Monday, 14 January 2013

Radish Cake (萝卜糕)

Radish Cake (萝卜糕)
Recipe Source: Dim Sum Inspirations by Choong Su Yin

Preparation: about an hour

Fairly simple dish but it is time consuming.  The end results is simply yummy especially if you pan-fry it.  I love it just the way it is i.e. steam .. but of course knowing my hubby, he loves it the pan-fry way!  Nothing beats home-made food! 

Ingredients A
40g dried shrimps (chopped)
100g chinese sausage (diced)
600g radish (shredded, scald & drain)
1400g water

Ingredients B
260g rice flour
60g corn flour
40g wheat starch
440g water

Ingredients C (Garnishment)
20 pieces shallot (sliced & deep fried)

Seasonings
2 tsp salt
1 tbsp sugar
1 tsp pepper
1 tsp monosodium glutamate
1 tsp sesame oil

Method
  1. Combine Ingredients B into mixture.
  2. Heat up some oil, fry dried shrimps & chinese sausage till fragrant.  Add in radish, water & Seasonings, stir evenly.  Flameout.  Pour it into flour mixture while it is still hot and continue agitating.
  3. With low hear, cook the batter till thickens.  Pour it into a greased pan, steam over high heat for 40 minutes.
  4. Garnish with fried shallots.
Notes
Water - instead of measuring in gram, if you have bottle measurement, measure it in litre.  It's the same.

For method 1 & 2, please prepare it in big pot (non-stick preferable) as you see in Ingredients A, you will pour in 1400g of water.

For method 3, cook the batter until the texture like paste.  Make sure you stir constantly as it may stick underneath.  If you find lumps, I think that's normal as it contains starch.  But end results of steaming don't contain lumps.

Make sure the water is boiled before steaming.  Also, constantly pour hot water by the side of the steamer.  Interval: 20-25 minutes.

Before steaming, I mix the fried shallots.  My personal opinion is that it is more fragrant and especially if you gonna pan-fry it.  You can also garnish more after steaming if you are going to eat it without pan-fry.

After steaming, leave it to cool.  You will observe that after steaming, the texture is like jelly but after much cooling, it will be harden.

Here I use square mould and I pour the batter almost 98% full as it does not raise as much like cakes.  

For this recipe, I find it very pepper-ish.  You can reduce the amount of pepper if you prefer it less pepper-ish.  Maybe add ½ to ¾ tsp.

Vanilla Sponge Cake

Vanilla Sponge Cake with Cranberries & mixed nuts
Recipe Source: Magic Steamed Cake by Alex Goh
Preparation: 10 minutes

Ingredients

A
3 eggs
120g castor sugar

B
½ tsp vanilla essence

C
30g melted butter

D

120g plain flour
1 tsp double action baking powder

Method

Vanilla Sponge Cake with Chocolate Spread

  1. Whip A until light and fluffy.  Add in B, mix until well-blended.
  2. Add in C, mix until well-blended.  Fold in sieved D, mix with hand until well-combined.
  3. Pour it into greased and lined 20cm round mould.
  4. Steam for 30 minutes.

Notes
This is the easiest cake to steam.
It is yummy on its own but you can add in other ingredients like cranberries, mixed nuts or even chocolate spread.

Steamed Marble Cake

Before Steaming
Recipe Source: Magic Steamed Cake by Alex Goh
Preparation: 20 minutes

Ingredients

A
280g butter
240g castor sugar

B
4 eggs

C
300g plain flour
2½ tsps double action baking powder

D
½ tbsp chocolate paste

Method
After Steaming

  1. Lightly grease and line 20cm (8 inch) round mould.
  2. Beat A until light & fluffy.  Add in B slowly, cream until smooth & light.  
  3. Add in sieved C, mix until well-blended.
  4. Take 100g of the above batter, mix with D until well-blended.
  5. Pour plain batter into greased mould.  Use a teaspoon to spoon the chocolate batter over the plain batter and swirl it to make marble effects.
  6. Steam for 70 minutes.
  7. Leave the cake aside for 5 minutes before moving out from the mould.


Notes

  • For ingredient D i.e. chocolate paste, I use Monbana chocolate spread.  I tried Milo powder mixed with water in my first attempt.  If you have Nutella, it will work, too.  This also saves time & $$ to purchase chocolate paste.
  • Instead of using round mould, I use 2 disposable aluminium tray (215 x 110 x 55mm) which I placed onto a supporting pan before steaming.  The batter is just nice for 2 aluminium tray.
  • For method 4, I use more than 100g of batter to have more choco taste.
  • To create marble effect, I pour the plain batter alternate with chocolate batter side by side (plain-choco-plain-choco) before swirling it with the spoon tips.  Be careful not to mix the whole batter. 


Thursday, 3 January 2013

Steamed Pumpkin Cake

Steamed Pumpkin Cake
Recipe Source: Magic Steamed Cake by Alex Goh
Preparation: 30 minutes

Ingredients:

A
3 eggs
200g castor sugar
½ tsp salt

B
160g pumpkin (steamed & mashed)
100g coconut milk

C
140g corn oil

D
300g plain flour
2 tsps double action baking powder
½ tsp sodium bicarbonate

E
60g pumpkin seed

Method

  1. Whip A until creamy.  Add in B, whip until well-blended.
  2. Add in C, mix until well-blended.
  3. Add in sieved D, mix until well-combined.
  4. Add in E, mix until well-blended.
  5. Pour it into 2 greased and lined loaf tins.
  6. Steam for 50 minutes.

Notes
Fyi, the pumpkin will require about 30 minutes or more to be soften.
Instead of using loaf tins, I used square mould.  (will revert with the size).
Don't worry if you notice a crack after steaming, it is supposed to be like that.